Manage Messages
Customer care employees can view all messages sent by the end-user using the secure messaging feature of the mobile or online banking application and respond to these messages. Threads are grouped by their status and placed in a common queue, so customer service representatives of that department can pick any of them up and provide an appropriate response.
A thread is a collection of messages. When a customer sends a message from the Secure Message section, it starts the thread. The subsequent interactions between the customer and the bank employee through the same messages window are part of that thread. A new thread is created only when the end user creates a new message.
Any employee who has the permissions to access the Message module can respond to the thread. The thread gets assigned to whoever replies to the thread, but this does not stop anyone to assigning the thread to themselves or anyone else using the on-screen options.
Use the feature to manage messages sent by end-user. This feature is applicable to the admin users who have the required permissions to access it.
Menu path: Messages > New Message
The app displays a list of messages. You can do the following:
- View message lists
- Create a new message
- Access templates
- Search for a message
- View message thread or history
- Filter messages
- Reply to a message
- Assign a message to respective department
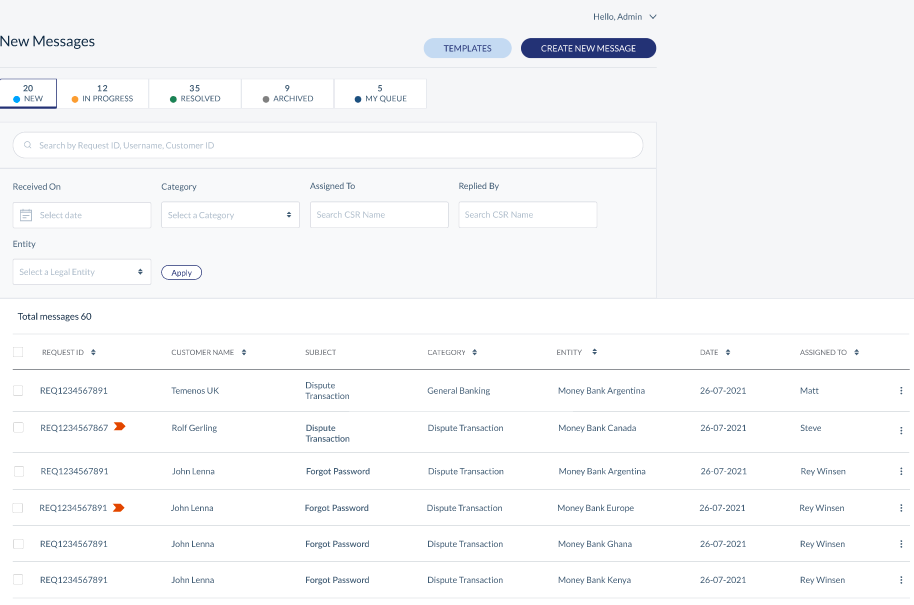
View Message List
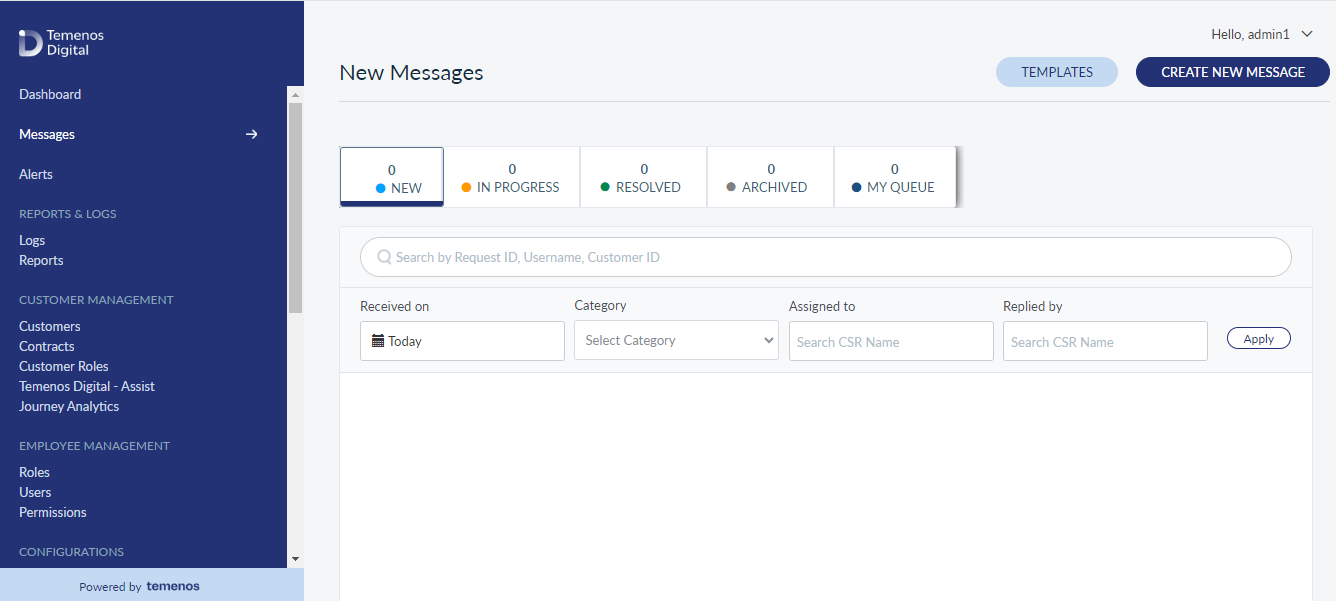
There are two main views in the Message module: Status and My Queue. The threads are categorized in five tabs - New, In Progress, Resolved, Archived, and My Queue. The first three tabs direct relate to the thread status. Archived messages are not considered in Search and filter queries.
My Queue is a consolidated view of all the threads that are assigned to the CSR that is currently logged in. Here, thread status is just a column. The 'Assigned To' column available in the other tabs is replaced by the 'Status' column, since the assignee is the same for all the threads in the list.
The app displays a list of messages.
Menu path: Messages > Select the required message tab
The messages list in New, In Progress, Resolved, and Archived tabs are represented as rows with the following details: Request ID, Customer Name, Subject, Category, Date and Assigned To. The rows in the message list in My Queue tab are similar to other tabs except for the Status details instead of Assign To details.
You can sort the list based on any of the columns by using the sort icon.
Pagination is available and you can navigate to the required page by choosing it from the list.
You can do the following:
- Filter list in each tab as required.
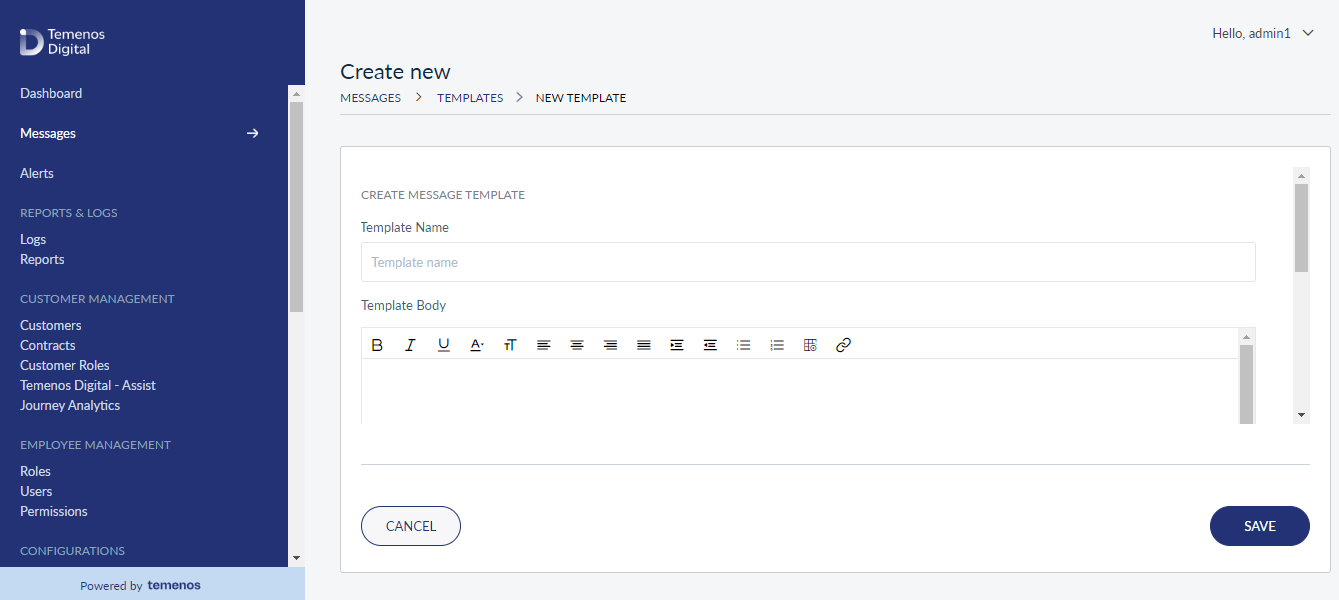
- Click Template to manage templates.
- Click a message to manage message thread or history.
- Click Create New Message to create a new message.
- Click the contextual menu available on each row to open and do the following. Click again to close the menu:
- Search for a message using the search criteria.
View List of New Messages Specific to Legal Entity
The app displays a list of new messages.
Menu path: Messages > View List of New Messages
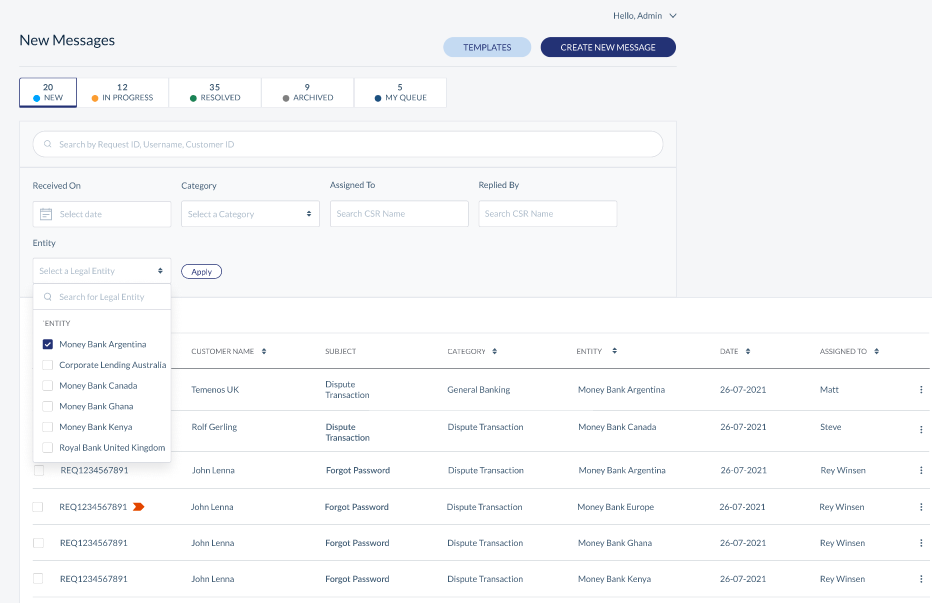
- The bank staff navigating to the Spotlight Messages can view new messages accessible to the user that are specific to the legal entity that the user can access.
- All the new messages specific to the legal entity to which the user has access should be listed on the view screen.
- Messages with statuses such as New, In Progress, Resolved, archived, and My Queue will be on the screen with a total number of messages in respective status, where New is selected to view messages.
- The Create New Message and Templates option will be on the messages screen.
- The user can search the Message by Request ID, Username, and Customer ID.
- Additional search parameters such as Received On, Category, Assigned to, Replied by and Legal Entity will be present in Advance Search.
- Once the user searches through any of these search parameters, respective searched messages will populate on the screen.
- Messages need to be listed on the screen with the following parameters:
- Request ID
- Customer Name and Service Type
- Subject
- Category
- Legal Entity
- Date
- Assigned To
- The user can filter messages based on the legal entity that the user is accessible to.
- Each Message will have an option to reply and reassign the Message. Provided, that the user has permission to update the Message.
- Reply - The user can reply.
- Reassign - The user can assign the Message to himself or to any other user who belongs to the same legal entity that the user can access.
- The user can select all the messages and assign all in bulk to the same user.
Filter Messages
Use the feature to get the required messages list in the required message type tabs. Apply any of the below mentioned filter criteria to get the required list of messages.
- Received On: Select the required date range from the date picker and apply them to view the list of messages received with in the selected date range.
- Category: Select the required category from the list to view the messages under the selected category.
- Assigned to: Enter the required CSR name to get the list of messages assigned to that particular CSR.
- Replied by: Enter the required CSR name to get the list of messages for which that particular CSR has replied to.
Create New Message
Use the feature to compose a new message. Spotlight not only enables you to send a message to the specific recipients, but also to a group of users based on their service type (Example, Retail Banking, Business Banking) and service definition.
Menu path: Messages > Create New Message
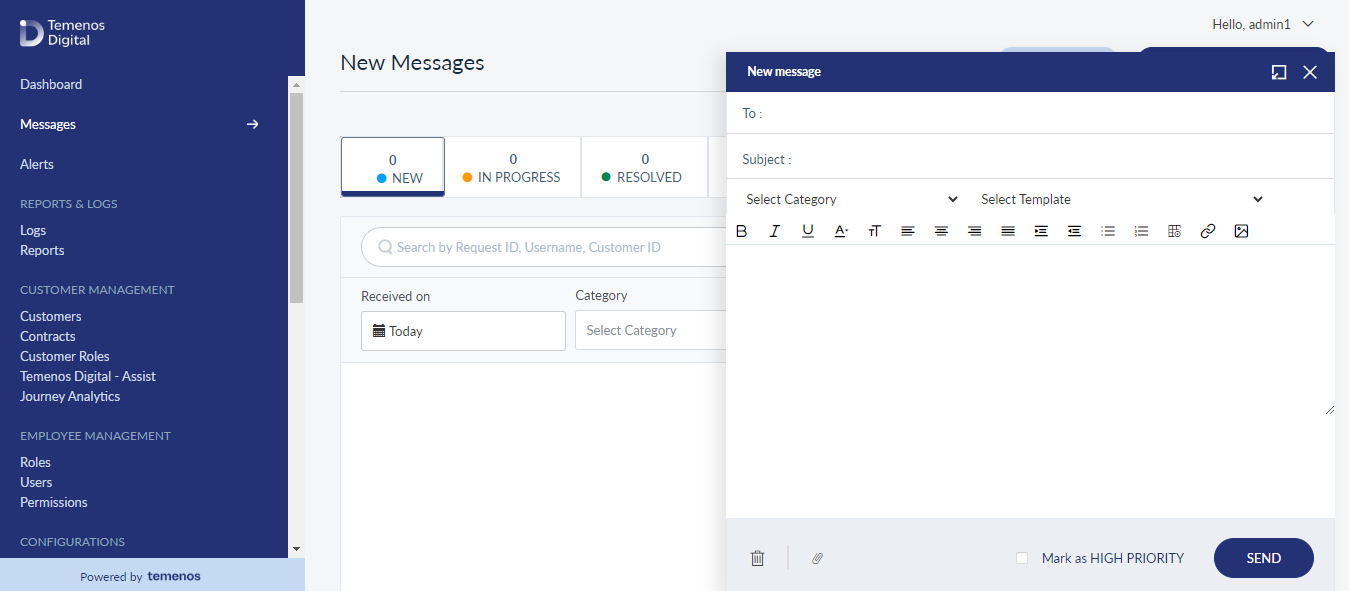
You can do the following:
- Enter the User Name of the recipient in the To field. You can send the new message to multiple recipients at the same time.
Otherwise, if you want to send it to a group of users based on their service type, enter the service type or service definition of the users you want to send the message to in the To field. You can send the new message to multiple service type or service definitions at the same time. - Write the subject of the Secure Message in Subject
- Select the required Message Category from the list.
- Select the required template for the new message from the Select Template list. This step is optional.
-
Select attach icon to select any required files if required. The supported file formats are txt, png, jpg, jpeg, doc, docx, and pdf.
You can attach a maximum of five files, and the maximum allowed file size is 1 MB. The maximum character limit for Subject is 50, for message body is 500, and the maximum number of attachments per message is 5.
- Click the minimize icon to minimize the new message window if required.
- Click Send, the message will be sent to the recipient.
You can delete the new message at any time if required.
Create New Message Specific to Legal Entity
Use the feature to create a new message specific to legal entity. The newly created messages will be sent to the users specific to entity.
Menu path: Sign in to Spotlight > Messages > Create New Message > Save
You can do the following:
- Sign in to the Spotlight application and click on Messages, where you view the Create New Message button.
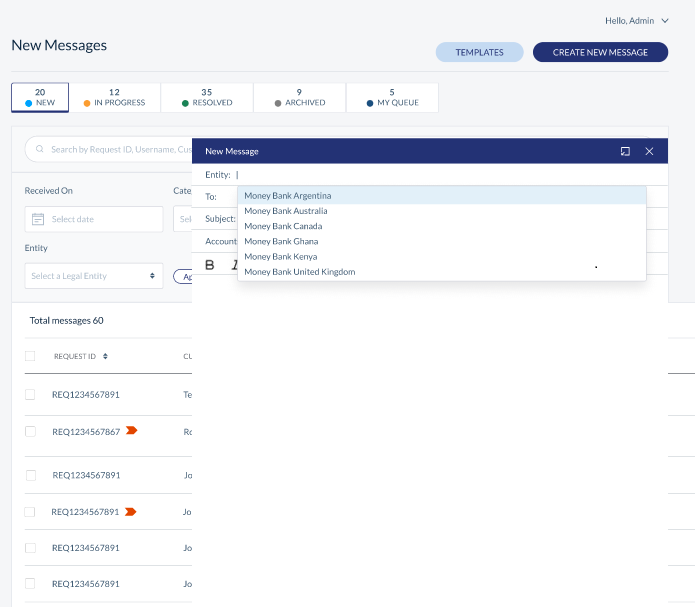
- After accessing the Create New Message button, the New Message window will allow the user to see the following fields:
- Legal Entity (Mandatory)
- To (Mandatory)
- Subject (Mandatory)
- Select Category (Mandatory)
- Select Template (Non-Mandatory)
- Check-box for marking Message as high priority (Non-Mandatory)
- Send Button (Should display an error message if any mandatory field is empty )
- Delete option (User can delete Message any point before sending Message)
- Attach file option (Non-Mandatory)
- Close and minimize option
- The user should select only those Legal Entities to which the user can access.
- After selecting the Legal Entity, the user can add only those customers/service type/services present under the selected Legal Entity.
Only accessible legal entities will be listed in the drop-down for Legal Entity while creating a new Message. Legal Entity selection will be a single-select.
For selected service types (Example: Retail Banking), messages will be sent only to the customers who have access to the selected Legal Entity for the selected service type.
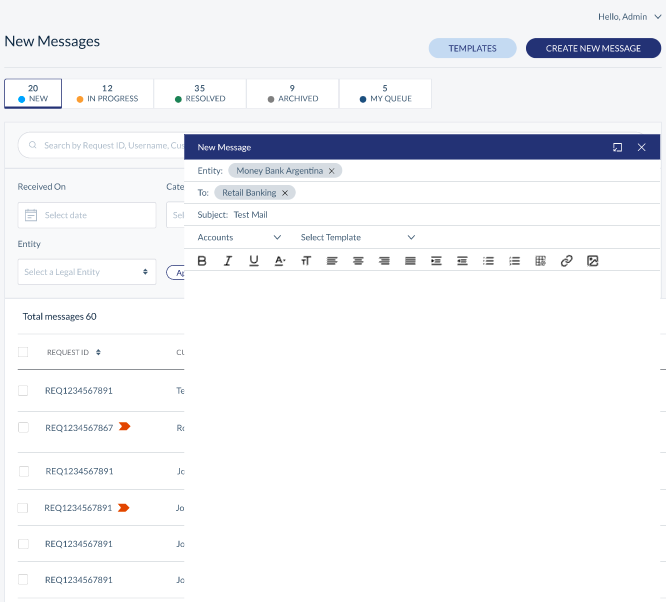
- If the entered customer/service type/service is not present under the selected Legal Entity, the user cannot add that customer/service type to the "To" field.
- Only accessible customer/service types can be added.
- Users can add multiple accessible customer/service types/services in the "To" field.
- The user can add a Subject, Category, and template if required while creating a new Message.
- The selection of the template will be specific to the selected Legal Entity. After the selection of Legal Entity, only those templates that belong to the selected Legal Entity should be available.
- Suppose the user changes/removes the Legal Entity before sending the Message, in that case, the "To" field and selected template will be clear, and hence, the user needs to add the "To" list and template again based on the selected Legal Entity.
- After adding all the details, the user can send the composed Message to all the users in the "To" list.
Priority Secure Message
Provides the ability for the bank to flag a Secure Message as urgent which in turn is presented to the customer immediately after login.
This feature can also be used by the Bank User to tag a particular message as priority.
You can do the following:
- Login to the Spotlight application and navigate to the Messages Module.
- Now, compose a new Secure Message which needs to be communicated to the Customer.
- After Composing the message, the System allows the Bank User to tag a particular message as priority.
- The Bank User can send that Priority Secure Message to the Customer.
- The System also provides a list of these Priority Messages which has been exchanged between the Bank User and the Customer.
- When the User logs into the Online Banking or Mobile Banking Channel, the Secure Message which has been set as Priority appears on top either in the form of a Banner or Service Outage Message.
- When the User clicks on this Banner / Service Outage Message, it directs them towards that particular priority message in the Messages module.
Search Message
Use the search option to search for a particular message using search criteria.
Menu path: Messages > New Messages > Search
The search results display the messages from New, Pending and Resolved message tabs. Enter the search keyword (name, username and customer id) and apply the search criteria.
The app displays the matching records automatically.
View Message History
Use the feature to view the history of the selected message. You can also assign the message to the related department or reply to the message from here.
Menu path: Messages > Select the Required Message tab > Click on the message row
The app displays the following details:
- Subject of the message
- Sent By details
- Sent On details
- Message body
- Attachments if any
You can do the following:
- Click on attachments icon and download the attachments if required.
- Select Mark as IN PROGRESS link to change the status of the selected message to in progress if required.
Click Back to navigate back to the message list.
View List of New Messages Specific to Legal Entity
Use the feature to view New messages which are specific to legal entity.
New messages received by the user will be listed based in the Legal Entity .
Menu path: Sign in to Spotlight > Messages > View List of New Messages
- The Bank Staff, navigating to Spotlight Messages, can view new messages accessible to the user that are specific to the Legal Entity that the user can access. All the new messages specific to the legal entity to which the user has access to will be listed on the view screen.
- Messages with statuses such as New, In Progress, Resolved, archived, and My Queue will be on the screen with a total number of messages in respective statuses, where New is selected to view messages.
- The Create New Message and Templates option will be on the messages screen.
- The user can search the message by Request ID, Username, and Customer ID.
Additional search parameters such as Received On, Category, Assigned to, Replied by, and Legal Entity will be present in Advance Search. Once the user searches through any of these search parameters, respective searched messages will populate on the screen.
- Messages will be listed on the screen with the following parameters:
- Request ID
- Customer Name and Service Type
- Subject
- Category
- Legal Entity
- Date
- Assigned To
The user can filter messages based on the Legal Entity that the user is accessible to.
- Each Message will have an option to reply and reassign the message. Provided that the user has permission to update the message.
Reply - The user can reply.
Reassign - The user can assign the message to himself or to any other user who belongs to the same legal entity that the user can access.
- The user can select all the messages and assign all in bulk to the same user.
Reply to a Message
Use the feature to respond to any required message sent by the customer.
Menu path: Messages > Select the Required Message tab > Click on the message row > Reply
You can also reply to a message with the help of contextual menu available on each row in the message list.
You can do the following:
- The reply message window is similar to create window and contains To, Subject, and Category details auto-filled from the selected message.
- Select the required template from the Select Template list and edit the template as required, and click Send.
- note that if you navigate away from the reply message, then it is saved as a draft message in the message thread. Click Draft, to reopen the reply message.
- A log is maintained for all the replies for a message in the message thread or history.
You can mark the status of the message as resolved if no further action is required on that message else the status of the message is changed to In Progress.
- The application automatically assigns the message to you when you send a reply to the message thread.
- When you reply a message thread whose status is New, the status is automatically changed to In Progress.
- You can attach a maximum of five files, and the maximum allowed file size is 1 MB.
Assign a Message
Use the feature to assign a new unresolved message thread to yourself or any other admin user (of related department). If an admin user responds to an unassigned thread, then the thread is automatically assigned to that particular user. Assignment is mainly for tracking and auditing purpose. A CSR can also reply to a message that is assigned to someone else. By doing so, that message is assigned to the CSR user who replied to the thread.
Menu path: Messages > Select the Required Message tab > Click on the message row > Assign / Reassign
You can also assign a message with the help of contextual menu available on each row in the message list.
You can do the following:
- Enter the required admin user name in full or in part and select the required user from the list in Assign to.
- Select Assign to me if you want to assign yourself to the selected message.
- Click Assign, the message gets assigned to the selected user.
You can cancel the process at any time. The changes are not saved.
In this topic